
Fence Installation Summerville SC is an excellent way to add privacy and security to your garden. In addition, it can help prevent animals from destroying your hard-earned vegetables and flowers.
Before building your garden fence, consult with your local zoning or regulation authorities to determine what permits you need. Hiring a professional surveyor to determine your property lines is also good.
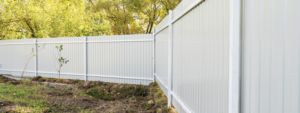
A good garden fence maintains privacy and helps keep pets, children, and wild animals from wandering into areas where they are not supposed to be. It can also help block out noise and light from neighbors’ homes or garages and even deter unwanted insects and birds.
Before beginning to build a new garden fence, it is important to understand the process of planning and measuring to ensure that your final structure meets local code requirements. It is also wise to check with neighbors and any adjoining landowners to confirm that you are not building the fence on their property line. Finally, it is recommended that you contact your local water and sewage authority to find out where the utility lines (water, gas, electricity, etc.) are located, as digging in these areas can be very dangerous.
Once you have confirmed your property lines and have a clear idea of where the fence will go, it is time to mark out the area using stakes and string. The location of any gates or openings in the fence should also be marked on the ground. It is a good idea to choose a time of year when the weather will be dry and not too cold, as this will allow you to finish the project quickly and more easily.
When marking out the area for your garden fence, it is a good idea to start with the corner posts first. These should be positioned at the intersections of your property lines, or where the fence will end (house, gate, tree, etc.). Line posts should be placed at intervals equal to the length of your panels, which will probably be every 6 or 8 feet. End posts will also need to be placed, if needed.
When working with post holes, it is a good idea to dig them at least three times deeper than the diameter of the post. This will give you plenty of room to add concrete to the top of each hole, which will help make the fence sturdier. Before pouring the concrete, it is a good idea to use a level to ensure that each post is perfectly vertical.
The first step in the process of installing a garden fence is to dig the holes for the posts. To do this, you will need a shovel and possibly a digging bar. If you don’t have these tools, you can rent them from some tool and garden centers. A post-hole digger will also make the job much easier and faster. It will save you time and effort as well as eliminate the risk of damaging underground water pipes or electricity cables.
If you are unsure about the location of these utilities, contact your local council or 8-1-1, the national, to have them marked before beginning excavation work. It’s important to know where these are located as they may interfere with the installation of your new fence.
When digging the holes, the rule of thumb is to bury the posts to one-third of their finished height in the ground. This will help prevent sagging in the future and keep your fence standing upright. It will also increase the strength of your fence and protect it from damage caused by frost.
Some people like to pour concrete into the post hole to “stiffen” it, but this isn’t a good idea and can weaken your fence over time. It’s important to use a professional who knows the proper concrete mixing techniques and how deep the posts should be set. It is also important to understand the process of frost heave and how it can affect your fence if the post holes aren’t installed correctly.
Once the holes are dug, seat the first post and add 6 to 8 inches of soil, checking that it is level on at least two sides with a carpenter’s level. Then, tamp the soil to ensure that it is solidly compacted.
A quick alternative to digging a hole for each post is to purchase a metal spike anchor and then drive it into the ground with a sledge hammer until the socket is completely below ground level. This method is quicker, but it’s not as durable as a well-made wooden post.
A good garden fence is an excellent way to add privacy and security to your property. It also keeps children and pets safe and prevents wildlife from entering your yard. It’s important to plan your fencing installation correctly and follow the proper steps. If you do, you can save money on labor and materials while still getting a professional-grade result.
Before you start any digging, check with your local utility company or call 811. They’ll tell you where all the underground pipes and cables are located. It’s important to know the location of these because you will need to dig several feet into the ground to install your fence posts. Attempting to build a fence without first knowing where your utility lines are can be very dangerous and expensive.
Next, use a garden spade or post-hole digger to dig all the required holes for your fence posts. Ensure the holes are the correct length and depth for your fence design, and mark their locations with flags or spray paint. If you’re using a standard 6 foot long garden fence, you’ll want your fence posts to be about 8 feet apart.
When you’ve dug the holes, add some gravel (pea-sized landscaping gravel works best) to each one. This will allow water to drain away from the posts during inclement weather and extend their life.
Once the gravel is in place, you can seat your first fence post by setting it into the hole. Use a level to make sure the post is straight, then fill the remaining space with concrete (try Quikrete Fast-Setting Concrete Mix for speed). After the concrete has set, use a shovel to level it out.
Finally, add a cap to your fence post. You can buy a wide variety of post caps, from simple flat ones to more elaborate finial designs. Choose the style that suits your taste and matches the rest of your garden fence.
Repeat the process for all your fence posts, making sure to carefully check each one for alignment and height with a level before seating it. Once the posts are all in place, you can begin installing your fence panels.
Once you’ve dug your posts and installed them securely, it’s time to start installing the panels or pickets. It’s important to take your time and do the job properly. Use a carpenter’s level to check that each new panel or piece of picket is plumb, and secure it with a nail or screw. Don’t rush or skimp on the quality, and don’t forget to treat all sawn ends with a wood preservative or oil.
Once the panels or pickets are in place, you can finish off the installation with caulking around any exposed sections of wood and a final coat of preservative or stain. This will protect against moisture and rot, while also slowing down the bleaching effect of sun’s UV rays on the wood. It will also give the fence a fresh and inviting appearance.
If you’re using an electric fence, make sure to test the energizer and check that all the connections are working correctly. It’s a good idea to also do regular upkeep on all types of garden fences, checking for signs of rot or pests, such as wood boring insects. If you do notice problems, act promptly to stop them from spreading.
There are plenty of different types of garden fences to choose from, so it’s worth spending a little time looking at the options before making any decisions. For example, if you’re planning to install a solid style of fencing, such as featherboard, you might find that it can be tricky to maintain. This is because the boards have a tendency to chip and may need replacing.
Another option is a hit-and-miss type of fence, which has slats fixed alternatively to the front and back of a batten. This gives a more open and airy appearance than solid styles such as weatherboard, and it’s suitable for both contemporary and traditional gardens. However, it does tend to require a bit more maintenance as the gaps between the slats can let wind through and put pressure on the panels and posts.